什么是 Opensearch
简介
OpenSearch 是一个由 Amazon Web Services (AWS) 发起、社区驱动的开源、分布式搜索和分析套件,它是 Elasticsearch 7.10.2 的分支。它广泛用于实时应用程序监控、日志分析和全文本搜索,因遵循 Apache 2.0 许可 而保持完全开源。 在开源技术领域,OpenSearch 是一个不可忽视的强大工具。它不仅是一个分布式的搜索和分析引擎,还基于广泛使用的 Apache Lucene 搜索库构建,为开发人员提供了高度的灵活性和可扩展性。无论用于实现应用程序中的全文搜索,还是希望在系统中添加实时监控和日志分析功能,OpenSearch 都能够出色地完成这些任务。 与传统的关系型数据库相比,OpenSearch 在全文搜索能力上有着明显的优势。它专为那些需要强大搜索功能的应用程序设计,优化了快速且灵活的全文搜索,使其在处理复杂数据集时依然能够保持高效的性能。同时,OpenSearch 支持分布式架构,可以在多个节点和集群上无缝运行,这使得它非常适合处理大规模数据和高并发的应用场景。
官网地址
https://opensearch.org/
OpenSearch 与 Elasticsearch 的对比
开发人员通常重视开源软件所带来的自由和灵活性,而当 Elastic 公司决定将 Elasticsearch 和 Kibana 转换为 Elastic 许可证时,这一自由受到了限制。为了响应这一变化,OpenSearch 项目诞生了。它是从 Elasticsearch 的最后一个开源版本(7.10.2)分支出来的,并且自 2021 年 7 月起在 Apache 许可证 2.0 版 (ALv2) 下发布,继续保留了开源软件的自由特性。 OpenSearch 的开发和维护由一个多元化的社区进行,而 Elasticsearch 主要由 Elastic 公司负责,尽管也有社区的贡献。OpenSearch 的目标是保持与 Elasticsearch 的兼容性,这意味着为 Elasticsearch 开发的应用程序可以在 OpenSearch 上以最少的修改运行。两者在功能上非常相似,都支持分布式搜索、分析以及大规模数据的处理。然而,OpenSearch 的开源性质使其在社区支持和扩展性方面更具优势。
搭建Opensearch服务
安装包下载
OpenSearch(版本 1.3.2,Linux 64 位版本) 下载链接:
https://artifacts.opensearch.org/releases/bundle/opensearch/1.3.2/opensearch-1.3.2-linux-x64.tar.gz
环境准备
| 配置 | 操作系统 | 节点 |
|---|---|---|
| 16Core * 32G * 200 G | Centos7.5 | 192.168.109.52 |
Linux 配置修改
- 文件系统:创建三个文件夹来分别存放OpenSearch 数据(data)、日志(logs)、快照(snapshots)
# 二进制包的大小基本不会变
# 日志是有rotation机制的,大小也基本不会变
# 数据量比较重要,为了保证性能,在有条件的情况下,建议使用SSD硬盘
[root@localhost opensearch]# mkdir -p /data/opensearch/{data,logs,snapshot}
-
修改Linux内核参数 配置文件:
/etc/sysctl.conf参数:vm.max_map_count=655360 -
修改打开文件句柄数和进程数限制 配置文件:
/etc/security/limits.conf内容:
* hard nofile 655360
* soft nofile 131072
* hard nproc 4096
* soft nproc 2048
- 解压 OpenSearch 二进制包
-
将 OpenSearch 1.3.2 版本包解压到
/data目录:tar xf opensearch-1.3.2-linux-x64.tar.gz -C /data mv /data/opensearch-1.3.2 /data/opensearch
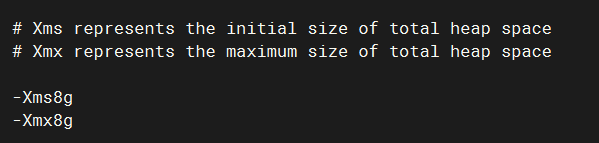
- 设置Java堆内存大小
官方建议方式(通过环境变量):OPENSEARCH_JAVA_OPTS=-Xms512m -Xmx512m
配置文件:
/data/opensearch/config/jvm.options设置值:
-Xms8g
-Xmx8g
说明:这里将堆内存设置为8GB(即系统内存的一半)。
- 创建 OpenSearch 运行用户
-
创建一个名为
opensearch的系统用户,该用户将用于运行 OpenSearch 和 OpenSearch-Dashboardsuseradd -r opensearch -s /usr/sbin/nologin -
将之前创建的目录
/data/opensearch*的所有权赋予该用户:chown -R opensearch:opensearch /data/opensearch*
- 创建OpenSearch启动Unit
[root@localhost opensearch]# vi /lib/systemd/system/opensearch.service
[Unit]
Description=OpenSearch
Documentation=https://opensearch.org
Wants=network-online.target
After=network-online.target

[Service]
Type=simple
RuntimeDirectory=opensearch
PrivateTmp=true
User=opensearch
Group=opensearch
Environment=OPENSEARCH_HOME=/data/opensearch
Environment=OPENSEARCH_PATH_CONF=/data/opensearch/config
#Environment=OPENSEARCH_JAVA_HOME=/usr/lib/jvm/java-11-amazon-corretto
#Environment=OPENSEARCH_JAVA_OPTS=
#Environment=RESTART_ON_UPGRADE=true
Environment=OPENSEARCH_STARTUP_SLEEP_TIME=5
Environment=OPENSEARCH_SD_NOTIFY=true
Environment=PID_DIR=/run/opensearch

WorkingDirectory=/data/opensearch

ExecStart=/data/opensearch/bin/opensearch -p ${PID_DIR}/opensearch.pid --quiet

StandardOutput=journal
StandardError=inherit

# Specifies the maximum file descriptor number that can be opened by this process
LimitNOFILE=65535

# Specifies the maximum number of processes
LimitNPROC=4096

# Specifies the maximum size of virtual memory
LimitAS=infinity

LimitMEMLOCK=infinity

# Specifies the maximum file size
LimitFSIZE=infinity

# Disable timeout logic and wait until process is stopped
TimeoutStopSec=0

# SIGTERM signal is used to stop the Java process
KillSignal=SIGTERM

# Send the signal only to the JVM rather than its control group
KillMode=process

# Java process is never killed
SendSIGKILL=no

# When a JVM receives a SIGTERM signal it exits with code 143
SuccessExitStatus=143

# Allow a slow startup before the systemd notifier module kicks in to extend the timeout
TimeoutStartSec=75

[Install]
WantedBy=multi-user.target
[root@localhost opensearch]#
[root@localhost opensearch]#
[root@localhost opensearch]# systemctl daemon-reload
Opensearch 配置修改
- 配置
/data/opensearch/config
# 指定集群名称和主机名
cluster.name: opensearch-cluster
node.name: vm-dbm-01

# 数据目录
path.data: /data/opensearch/data

# log目录
path.logs: /data/opensearch/logs

# 禁用交换内存
bootstrap.memory_lock: true

# 修改监听地址,外部机器也可以访问
network.host: 0.0.0.0

# 默认的端口号
http.port: 9200

# 设置单机模式运行
discovery.type: single-node

# http 接口是否启用 SSL/TLS 加密(https 需要证书,没有证书此项先置为 false)
plugins.security.ssl.http.enabled: false
启动Opensearch
systemctl start opensearch.service
systemctl status opensearch.service
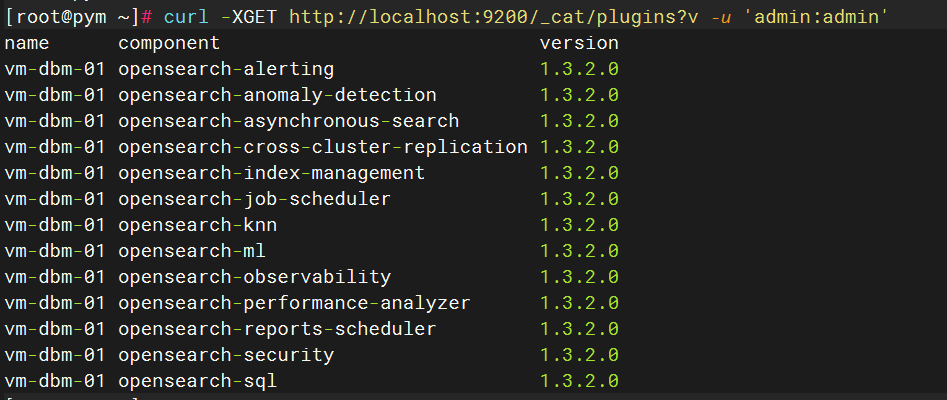
验证是否启动成功
curl -XGET http://localhost:9200/_cat/plugins?v -u 'admin:admin'
启动 OpenSearch-Dashboards
下载
OpenSearch-Dashboards(版本 1.3.2,Linux 64 位版本)
https://artifacts.opensearch.org/releases/bundle/opensearch-dashboards/1.3.2/opensearch-dashboards-1.3.2-linux-x64.tar.gz
安装
- 解压 OpenSearch-Dashboards 二进制包
将 OpenSearch-Dashboards 1.3.2 版本包解压到
/data目录:tar xf opensearch-dashboards-1.3.2-linux-x64.tar.gz -C /data mv opensearch-dashboards-1.3.2 opensearch_dashboards chown opensearch:opensearch -R opensearch_dashboards
配置
配置yml
- 配置路径:
/data/opensearch_dashboards/config/opensearch_dashboards.yml
# 添加监听地址,外部机器也可以访问
server.host: "服务器IP"
#设置中文
i18n.locale: "zh-CN"

opensearch.hosts: ["http://localhost:9200"]

# 以下参数不需要修改,默认即可
opensearch.username: "kibanaserver"
opensearch.password: "kibanaserver"
opensearch.requestHeadersWhitelist: [ authorization,securitytenant ]
配置启动Unit
- 创建OpenSearch Dashboard启动Unit
vi /lib/systemd/system/opensearch_dashboards.service
[Unit]
Description=OpenSearch Dashboards
Wants=network-online.target
After=network-online.target

[Service]
Type=simple
User=opensearch
Group=opensearch
Environment=KILL_ON_STOP_TIMEOUT=0
Environment=OSD_PATH_CONF="/data/opensearch_dashboards/config"
WorkingDirectory=/data/opensearch_dashboards
ExecStart=/data/opensearch_dashboards/bin/opensearch_dashboards
Restart=always
RestartSec=3

[Install]
WantedBy=multi-user.target
[root@localhost opensearch]#
[root@localhost opensearch]# systemctl daemon-reload
设置防火墙
firewall-cmd --permanent --add-port={9200/tcp,9300/tcp,5601/tcp}
firewall-cmd --reload
启动服务
systemctl restart opensearch_dashboards
systemctl status opensearch_dashboards
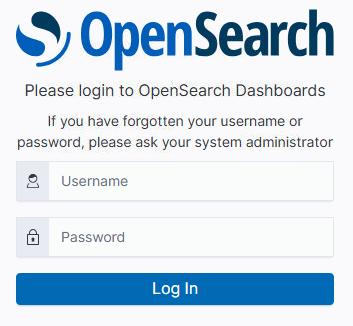
初始登陆信息:admin,admin